How to Provision Kubernetes Resources Using Terraform and Helm Charts
Video
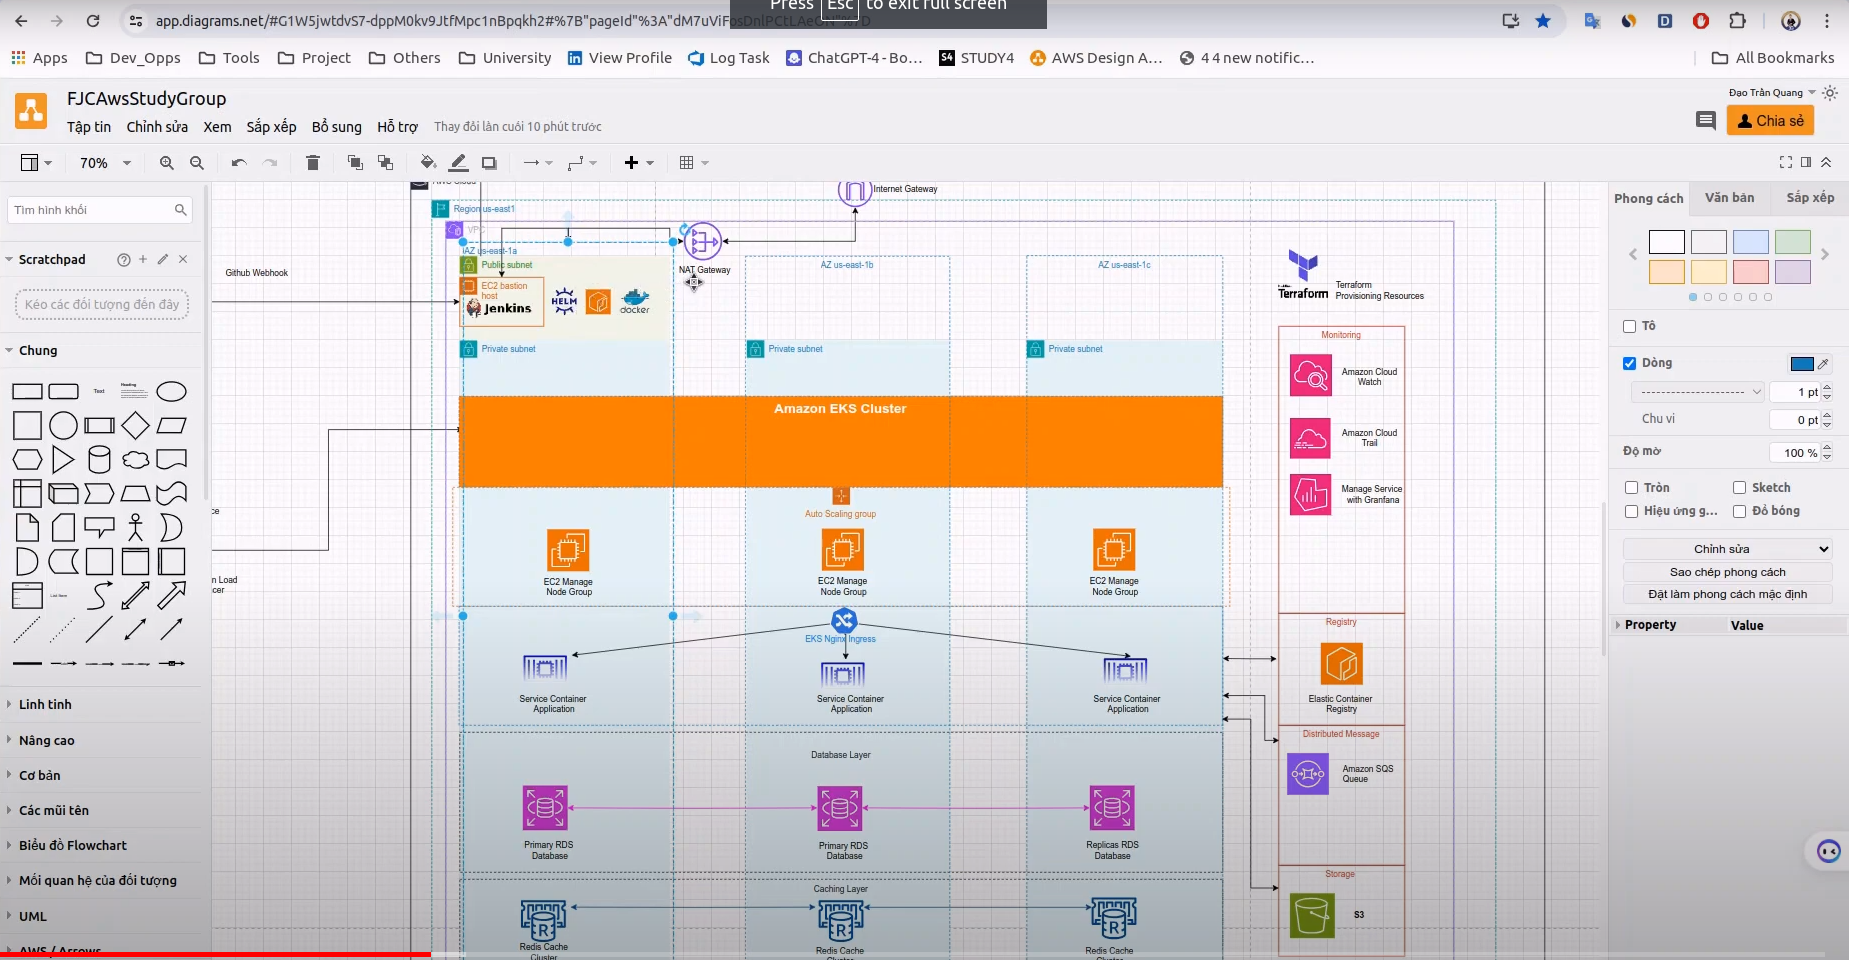
Overall
Is this post, we will configuration Helm Chart and Kubernetes Resource for Cluster, Helm Chart is power tool for management resources on Kubernetes. We need to know each component to use.
What is the Helm Chart ? Keys benefits of them
What is the Helm Chart
A Helm Chart is a package that contains all the necessary files and resources to define, install, and upgrade even the most complex Kubernetes application. Helm, often referred to as the Kubernetes package manager, uses charts to simplify the deployment and management of applications on Kubernetes clusters.
Keys benefits:
Simplification of Kubernetes Applications Configurations:Helm charts help in bundling Kubernetes resources together into a single unit, creating a simple way to deploy and manage applications without having to deal with each resource separately.
Templatization:Helm charts use templating, which allows for reusable Kubernetes manifests. Parameters can be passed into the Helm chart to customize deployments for different environments, like development, staging, and production.
Version Control and Revisions:Each time a Helm chart is packaged, it can be versioned. This allows you to deploy and rollback to specific versions of your application, providing better control over your deployments.
Dependency Management:Helm charts can define dependencies on other Helm charts or specific versions of charts. This automates the deployment of the other services your application may depend on.
Easy Updates:Once a Helm chart is installed, altering or upgrading the deployment can be achieved with very simple commands. This greatly reduces the complexity compared to traditional methods of updating applications on Kubernetes.
Shared Resources:Helm charts can be shared across the organization, so the same patterns for deploying and managing applications can be reused, ensuring consistency and saving time.
Community and Ecosystem:With Helm’s popularity, there’s a large community and ecosystem that contribute their Helm charts. You can utilize existing charts provided by the community, so you don’t have to write everything from scratch.
Release Management:Helm’s release management system allows you to track and manage the installations of your charts across the cluster.
Automation-Friendly:Helm can be integrated into automated CI/CD pipelines, which simplifies the process of continuous development and deployment.
Easy Rollbacks:Should a deployment fail or result in an unstable release, Helm allows for easy rollback to a previous stable version of your application.
Terraform Provision Kubernetes Resources
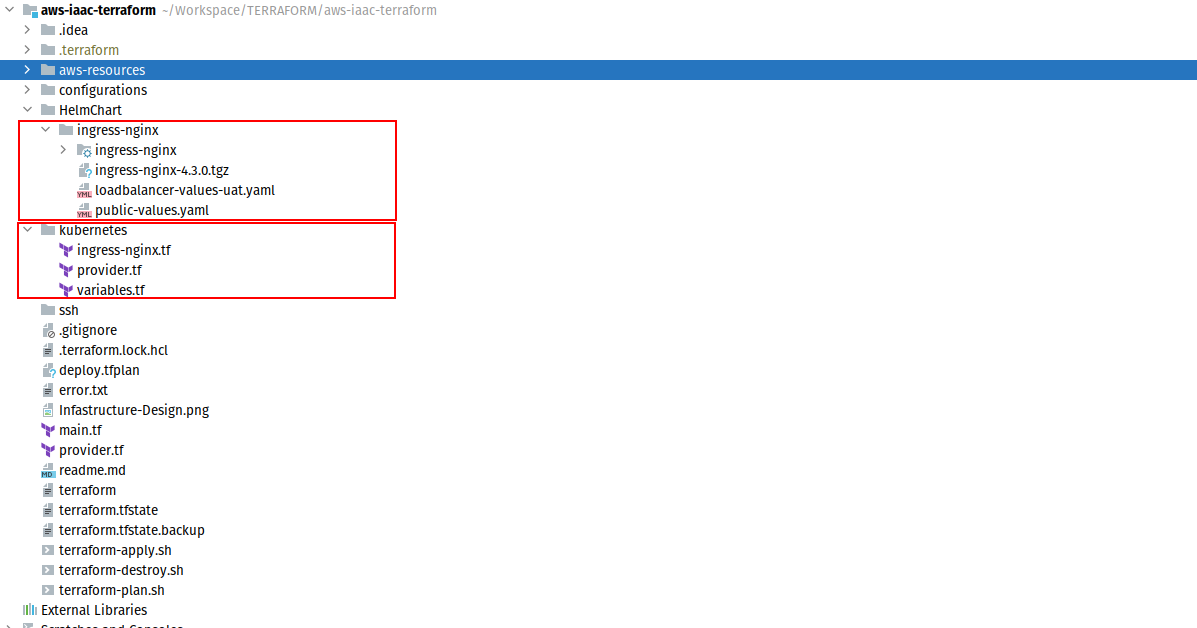
As the image, we have 2 directory
- HelmChart directory where contains helm chart project apply resource for kubernetes
- Kubernetes is directory contains terraform file to management resources on
kubernetes
HelmChart directory
HelmChart is directory contains helm chart project we will use in this labs, that’s Ingress Nginx Controller, if you don’t know What is Ingress Nginx Controller, please follow this link
This file is provision Ingress Controller File: https://github.com/daotq2000/aws-iaac-terraform/tree/main/HelmChart/ingress-nginx
controller:
replicaCount: 2
ingressClassByName: true
ingressClassResource:
name: "public"
enabled: true
default: false
controllerValue: "k8s.io/public-ingress-nginx"
## Name of the ingress class to route through this controller
##
ingressClass: public
config:
#Upload
client-body-buffer-size: 32M
proxy-body-size: 100G
proxy-buffering: "off"
proxy-read-timeout: "600"
proxy-send-timeout: "600"
#Logging
log-format-upstream: '$remote_addr - $remote_user [$time_local] "$request" $status $body_bytes_sent "$http_referer" "$http_user_agent" $request_length $request_time [$proxy_upstream_name] [$proxy_alternative_upstream_name] $upstream_addr $upstream_response_length $upstream_response_time $upstream_status $req_id $http_x_device_id|$http_x_device_os|$http_x_device_os_version|$http_x_device_locale|$http_x_app_version|$http_x_app_id'
# Accesslog Request IP
compute-full-forwarded-for: "true"
use-forwarded-headers: "true"
service:
type: NodePort
nodePorts:
http: "30080"
https: "30443"
tcp:
32069: 32069
32070: 32070
31280: 31280
udp: {}
metrics:
enabled: false
serviceMonitor:
enabled: true
#tcp:
#  32069: "external/window-rdp-external:32069"
#  32070: "external/avnet-poc-external:3393"
#  31280: "external/squid-external:31280"
In directory, we need to only a file is public-values.yaml, this is chart value file , kubernetes use this file to create deployment for Nginx-Ingress-Controller
Terraform provision Kubernetes directory
There are contents of directory, it’s sub terraform project, we will execute this after resource at aws-resources has been completed.
.
├── deploy.tfplan
├── ingress-nginx.tf
├── provider.tf
├── terraform-apply.sh
├── terraform-plan.sh
├── terraform.tfstate
├── terraform.tfstate.backup
└── variables.tf
We have complete there files below:
1. Create file variables.tf
  variable "eks-context-name" {
  type = string
  default = "arn:aws:eks:us-east-1:846338211683:cluster/Eks-cluster"
  }
- This file is config environment variables for terraform, in specific file we can use syntax
var.valueto get value from environment file
2. Create file provider.tf
provider "kubernetes" {
config_path    = "~/.kube/config"
config_context = var.eks-context-name
insecure = true
}
provider "helm" {
kubernetes {
config_path    = "~/.kube/config"
config_context = var.eks-context-name
insecure = true
}
}
config_path = "~/.kube/config"Code block read kubernetes configuration from directory${HOME}/.kube/config.config_context = var.eks-context-nameRead Amazon Kubernetes Cluster name fromvariables.tf
3. Create file ingress-nginx.tf
    resource "kubernetes_namespace" "nginx-ingress" {
    metadata {
    annotations = {
    name:"ingress-nginx-namespace"
    }
    name = "nginx-ingress-namespace"
    }
    lifecycle {
    }
    }
    resource "helm_release" "public-nginx-ingress" {
    name       = "ingress-public"
    chart      = "ingress-nginx"
    repository = "https://kubernetes.github.io/ingress-nginx"
    version    = "4.3.0"
    namespace  = kubernetes_namespace.nginx-ingress.id
    values = [
    file("../HelmChart/ingress-nginx/public-values.yaml")
    ]
    }
4. Create file terraform-plan.sh
terraform plan -out deploy.tfplan
using command terraform plan -out deploy.tfplan to plan change resource
5. Create file terraform-apply.sh
terraform apply deploy.tfplan
using command terraform apply deploy.tfplan to apply change resource
Refer to my source code
**Github repository: ** https://github.com/daotq2000/aws-iaac-terraform
Conclusion:
Mastering Terraform for Kubernetes provisioning enhances your DevOps workflow, making deployments smoother and more reliable. Explore related resources on our platform for further learning.