Verify Resource & Testing Connection
Verify Resource
1. Verify Resource
To verify connection created by Terraform, we can use multiple tools provide by AWS
2. Generate Kubernetes Config
You can following instruction release from AWS at [here] (https://docs.aws.amazon.com/eks/latest/userguide/create-kubeconfig.html) or read construction below:
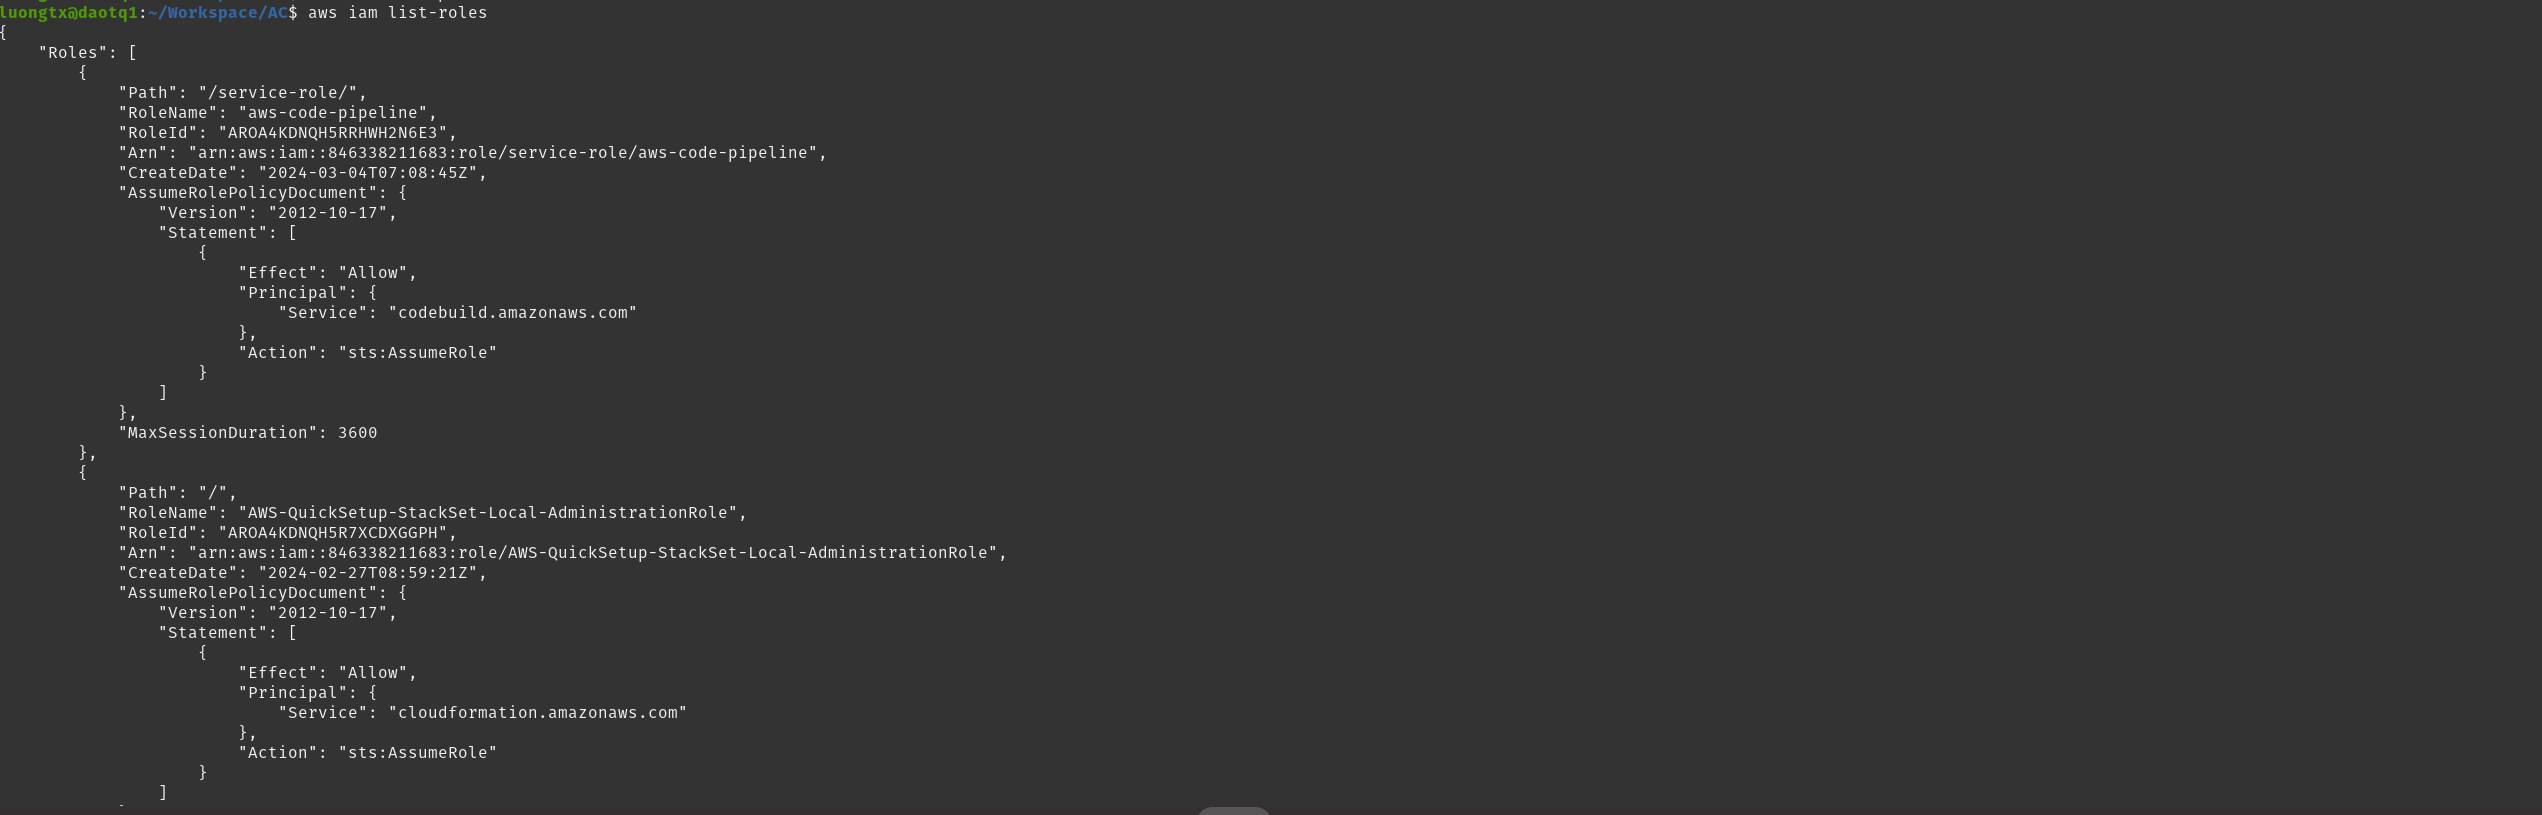
Verify you are connected with AWS by aws cli, verify connect available without error using command below
aws iam list-roles
If you get result below, you are successfully connected to AWS by AWS CLI
 2. Generate Kubernetes Config, using command below
   aws eks update-kubeconfig --region region-code --name my-cluster
   example: aws eks update-kubeconfig --region us-east-1 --name Eks-cluster
By default, the resulting configuration file is created at the default kubeconfig path (.kube) in your home directory or merged with an existing config file at that location. You can specify another path with the –kubeconfig option.
You can specify an IAM role ARN with the –role-arn option to use for authentication when you issue kubectl commands. Otherwise, the IAM principal in your default AWS CLI or SDK credential chain is used. You can view your default AWS CLI or SDK identity by running the aws sts get-caller-identity command.
For all available options, run the aws eks update-kubeconfig help command or see update-kubeconfig in the AWS CLI Command Reference.
After run command above, config have been write to file: ${HOME_DIRECTORY/.kube/config}, result config such as below:
apiVersion: v1
kind: Config
clusters:
- name: Eks-cluster
  cluster:
  server: https://659792B3259005B18013EDB0C2AE5B83.sk1.us-east-1.eks.amazonaws.com
  certificate-authority-data: LS0tLS1CRUdJTiBDRVJUSUZJQ0FURS0tLS0tCk1JSURCVENDQWUyZ0F3SUJBZ0lJRWVJNkNrNTFzMUF3RFFZSktvWklodmNOQVFFTEJRQXdGVEVUTUJFR0ExVUUKQXhNS2EzVmlaWEp1WlhSbGN6QWVGdzB5TkRBME1qSXdOek0zTVRGYUZ3MHpOREEwTWpBd056UXlNVEZhTUJVeApFekFSQmdOVkJBTVRDbXQxWW1WeWJtVjBaWE13Z2dFaU1BMEdDU3FHU0liM0RRRUJBUVVBQTRJQkR3QXdnZ0VLCkFvSUJBUUN5TWhnRFM5cWpMOElhRDF4amxRVE1oOHRXWmMzSlNOcWFIYVdNQkhxOFEvc05RRS83RGFOWHFyclgKR1MvYU1JU3dKRmZYVFl2a3EwTlB3Z3RmMm8vTmJVZTNZNlhMbjl0ekZoYlMzMzlGekFnQ3hpRldUMW9RTVBMVApCd05ycUZEM2ErVVA4S2Q5eDIyaWMvbkhHeUZyREdncFVnL2ZPL3NHYXJqL21zUWNqTVdZYS91WUZROFpTKzV1Cmw3emVkc0xybEhHUm56NHQxVTNDckVqbzBzbGRlZm9ZRzVhOW1oV1V1cytScCtpL0RZNW0xM2VJam1uWlQxS28KT0o4V0RpOVN0ZHZPcm5JMFU1blNmMm5xUVZXMExVM2g5TTJ4NCtQNVl5UWhqck1aK1grZkRwSWtZbjM5NktwdgpLU1hSdFpLRXFWSjZQRVRSNHVnOHJDQ1IzNDQvQWdNQkFBR2pXVEJYTUE0R0ExVWREd0VCL3dRRUF3SUNwREFQCkJnTlZIUk1CQWY4RUJUQURBUUgvTUIwR0ExVWREZ1FXQkJUKzFYUEQyd3pRNHMzWE5RRWNrWER4VFJaakhEQVYKQmdOVkhSRUVEakFNZ2dwcmRXSmxjbTVsZEdWek1BMEdDU3FHU0liM0RRRUJDd1VBQTRJQkFRQXJFQlQrYVFzegp4RG9XWjdvdDFnRGlQTkcyTGUrL1pzTGlsUVF3WjMxMWRGbk5aVE9sUmlPSWdjd1UwTXgvS05lYjY2T29MM0VTCitjOHYrd21LV3BURktBa0prNnhtMmIrRnZCRENiT2hWTUMvVFRzSjdlVlpRMVp1a0t3SVpaZCs1cmNjQ2lvNjgKa2hHVjhGd1NFZUhYSVF6Q3BIa1dhaWl6RVZxR3hmOFdBTkNPQ0VWTVJUOEJPcmxSZGZ5RXB1YjZRcDV3ZzloVgpUQkVNSkw1NmhWWEc1d2RDZW5lZ095UlpKWkNVTldEdm9ldnY5NnZLNGtTN0ZUWHZucGZOQTR1c3MydGRWZEdiCjdJTFB5Wk5LbEc3bEJLdUxOSkRFaENxN1pqUHlXZGlFZmJsYW1kdjFVbFM4VFhJeE9TRzZaTFcxenBJSis2dnkKSHB0NENDSjJEU0lwCi0tLS0tRU5EIENFUlRJRklDQVRFLS0tLS0K
  - cluster:
    certificate-authority-data: LS0tLS1CRUdJTiBDRVJUSUZJQ0FURS0tLS0tCk1JSURCVENDQWUyZ0F3SUJBZ0lJQXZXenpuMkNxeVl3RFFZSktvWklodmNOQVFFTEJRQXdGVEVUTUJFR0ExVUUKQXhNS2EzVmlaWEp1WlhSbGN6QWVGdzB5TkRBME1qSXdPRFE1TVRoYUZ3MHpOREEwTWpBd09EVTBNVGhhTUJVeApFekFSQmdOVkJBTVRDbXQxWW1WeWJtVjBaWE13Z2dFaU1BMEdDU3FHU0liM0RRRUJBUVVBQTRJQkR3QXdnZ0VLCkFvSUJBUUNrSHZZU3cxeFJFNzNVVHgvSkJUaVNJalZlcTB4ZUlvYXZ5WG9mY0VhalFnN2liV3pTUFp4NjhFTFIKY01iSlRzOUp4ZVJnd3ZMWlU4UCtaZGpUZDhWdXdkcytXR2lMOWw1MjA4YUw1a3hMS3VOVEhpWDgza2hsQ2xYegpaL1BaM2hQWHlUQzI1aWd3TTdFT2VmTXBoNnNaUVNoTFpHbG9wQnArVDhxR1VhLzk1SEU2enFXMzFmNWcwbkt5CnZRRjI2WkUwd3plWmdHeFFkU2dONHR0UUtaTzBrUDNHKzVTYmM4YUlGbkdJRURWWjZIRjZ2ZThKalB1Wjd2MzAKY1dsQXFMekYxNmtSbW1NSzBTNnA2ekN4MEszWUcxUWs5M0tOL0k5elFUQnZWV1B3YXBzdW8wanJtMm93bmdONApLYWp2NC8zVW8yTnVScUJnSjZqR083Nkl2dWJaQWdNQkFBR2pXVEJYTUE0R0ExVWREd0VCL3dRRUF3SUNwREFQCkJnTlZIUk1CQWY4RUJUQURBUUgvTUIwR0ExVWREZ1FXQkJSdmdMc1RiZ24vUE9TWlJ4Q21PZ2svTWxKTzJUQVYKQmdOVkhSRUVEakFNZ2dwcmRXSmxjbTVsZEdWek1BMEdDU3FHU0liM0RRRUJDd1VBQTRJQkFRQUZxZzBQQjAwaQpseUtNZDNxdzcxRDBtRE00bllEU3l5cjBmRTFpT3FyVkpkWDcwVGZIUFV1clliK0hORGQ1Tk1KQkpxL3huNXo4CkdwNmtSSnJMMllIS0pqaTU3RjI3Q21vN2xya2FSbG8xN0djcExkSEd6VE1INWtrdjViaXRhVkVORm95OVh4UVcKUFI0WGdIWW5tUUJ1TWZvNVFIOThvMW9KTndKdkpJY3VyWis1dUdCbHJjdTVCNTFFeGVEaWdaTlIvMTFVY3FmQQpDYmw1TGI0V25CelJ4Sk4vTlZQWWVjMGdDUnV5TkNNQXVDL1VsZy9WSjJmdmErSGxrL1F1NnFIeE9WSlovS2RXCkdTQ1hCaDhXYmpTMThFcm8vRGpGNU1FeHFKSGdSNUNFK3dmMlFiU3pURUx1TndwV2Uya0dnRWgvazgwVXhJejMKajUwazMzNStnVlpNCi0tLS0tRU5EIENFUlRJRklDQVRFLS0tLS0K
    server: https://E22AC992937C3F737DE6664377B977B0.gr7.us-east-1.eks.amazonaws.com
    name: arn:aws:eks:us-east-1:846338211683:cluster/Eks-cluster
    current-context: arn:aws:eks:us-east-1:846338211683:cluster/Eks-cluster
    users:
  - name: arn:aws:eks:us-east-1:846338211683:cluster/Eks-cluster
    user:
    exec:
    apiVersion: client.authentication.k8s.io/v1beta1
    args:
    - --region
    - us-east-1
    - eks
    - get-token
    - --cluster-name
    - Eks-cluster
    - --output
    - json
    command: aws
    env:
    - name: AWS_PROFILE
    value: default
    contexts:
  - context:
    cluster: arn:aws:eks:us-east-1:846338211683:cluster/Eks-cluster
    user: arn:aws:eks:us-east-1:846338211683:cluster/Eks-cluster
    name: arn:aws:eks:us-east-1:846338211683:cluster/Eks-cluster
Testing Connection
Next, we need verify connection to make sure if container(It’s application develop by any programing language such as Java, Python, NodeJS…) running, it can connect to rds database and redis cache.
There are categories we need verify to make sure connection always available:
- Connection SSH from Internet to Bastion Host
- Bastion Host can connect to RDS Database, Redis Cache, Elastic Kubernetes Cluster from VPC
- Bastion Host can SSH to Worker Node from VPC
- Worker Node can connect to RDS Database, Redis Cache, Elastic Kubernetes Cluster, Elastic Container Registry from VPC
- Access Kubernetes Cluster (EKS) using kubectl
Hands-on
1. SSH to Bastion Host from Internet
Step 1: Download keypair you have generated at aws-resources/variables.tf. this is ssh_access_key variable
Step 2: Using command below to ssh server
$ chmod 400 public-bastion-host.pem
$ ssh -i public-bastion-host.pem ec2-user@{Your Bastion Host IP}
If you received result as image below , you are successfully ssh to server.

2. Ping connection from Bastion Host to Rds Database, Redis Cache, EKS cluster
After ssh successfully into bastion host, next we need instal telnet tool to ping connection
Install telnet tool at Bastion Host using command below
sudo yum install telnet
If you received result below, you are successfully installed telnet tools
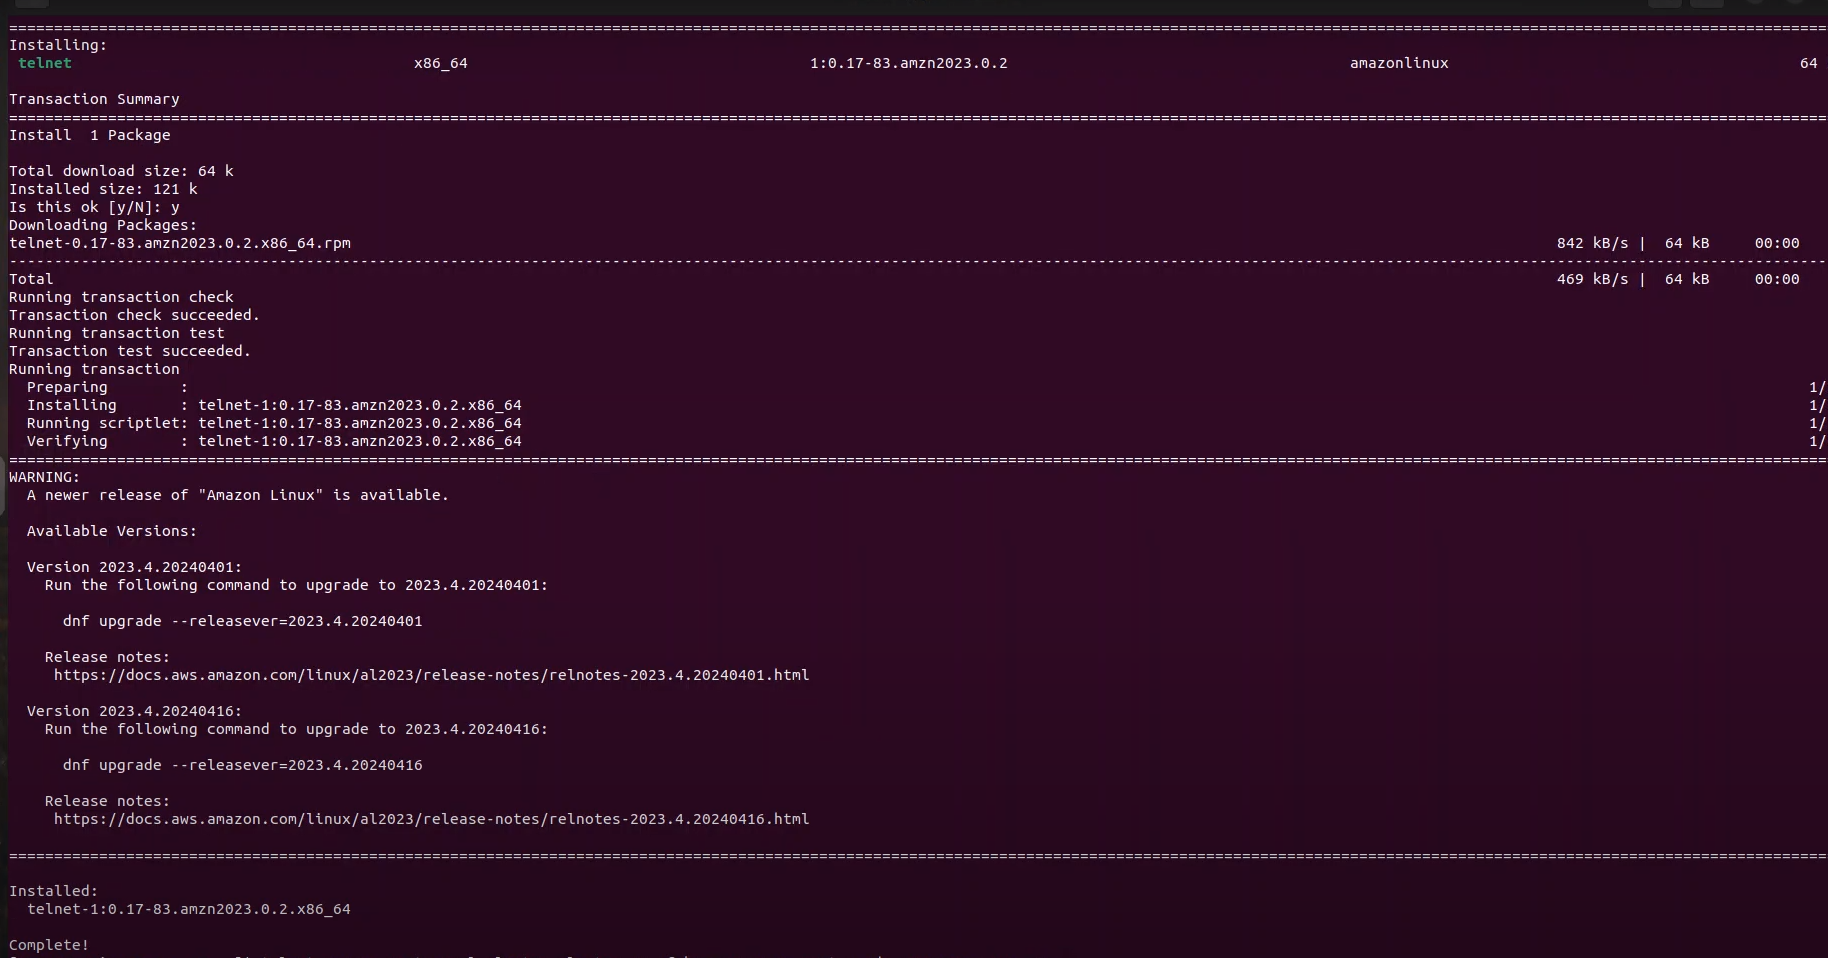
If you haven’t received result as image below, please check with your nat, internet gateway maybe connection to Internet has failed
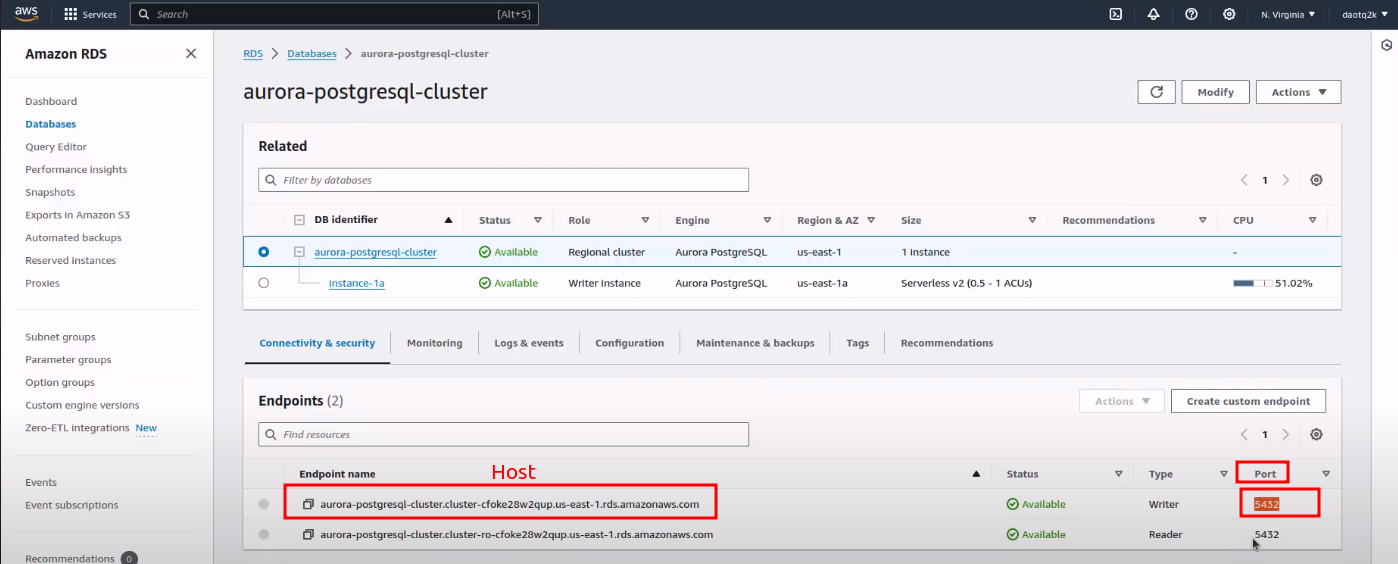
2.1 Ping connection from Bastion Host to RDS Database
Using command below to ping
telnet {host-aurora-postgres} {port-running}
- {host-aurora-postgres} and {port-running} you can get it at Amazon Console like below
If you received result below , you have connected to RDS Database from Bastion host

Or if you received result below, you haven’t connected to RDS Database, need to check Security Group, Inbound traffic from Bastion Host to RDS datbase

2.2 Ping connection from Bastion Host to Redis Cache Cluster
Using command below to ping
telnet {host-redis-cluster} {port-running}
If you received result below , you have connected to Redis Cache from Bastion host

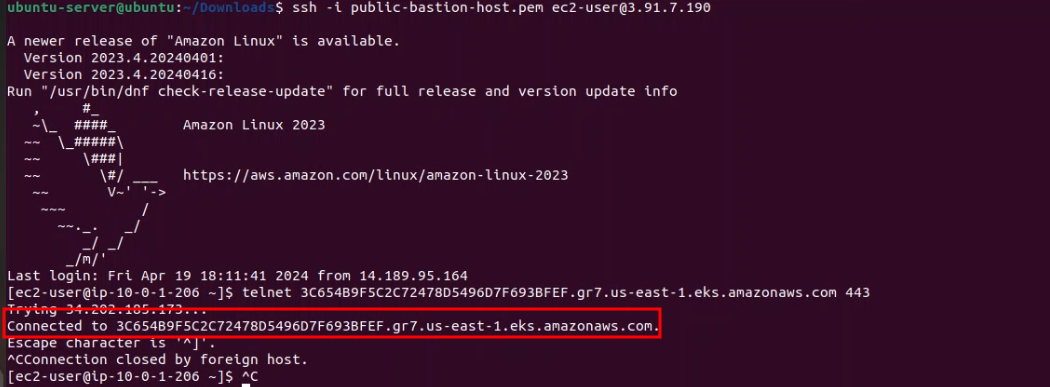
2.3 Ping connection from Bastion Host to Elastic Kubernetes Cluster(EKS)
Using command below to ping
telnet {host-eks-cluster} {port-running}
If you received result below , you have connected to Redis Cache from Bastion host
3. Bastion Host can SSH to Worker Node from VPC
Now, we need to ssh to Worker Node to monitoring, troubleshoot issue
Step 1: Copy your pem file generate at 1. SSH to Bastion Host from Internet to Bastion Host , using command below
vi public-basion-host.pem
Copy pem content file into this and using Ecs + wq to save file
Step 2: we need to permission this file for only system can access, using command below
chmod 400 public-basion-host.pem
Step 3: Test ssh to Worker node using command below
ssh -i public-basion-host.pem ec2-user@{your-private-worker-node-ip}
- {your-private-worker-node-ip} you can get this value at Amazon Console, why we need get private IP? Because of when provisioning resources with terraform. We have configured worker node inside private subnet, mean which can’t access by internet. It’s internal communication, it help connection is safely and more effective because of save money charge for outbound traffic
4. Worker Node can connect to RDS Database, Redis Cache, Elastic Kubernetes Cluster, Elastic Container Registry from VPC
As mentions, all resources need to avoid access from Internet, now we need ping connection from Worker Node to that resources, It’s ensure when new deployment have been deploy to kubernetes, which work fine, no any element loss connection to require resources.
5. Access Kubernetes Cluster (EKS) using kubectl
Access to Cluster using command below:
kubectl get cluster-info
If your kubernetes right config in file ${HOME_DIRECTORY/.kube/config}, you will receive result below