Terraform Provision Template for Zero Downtime Applications
Video
What is Terraform?
Terraform is an open-source infrastructure as code (IaC) software tool created by HashiCorp. It allows users to define and provision data center infrastructure using a declarative configuration language known as HashiCorp Configuration Language (HCL), or optionally JSON.
Why we need using Terraform?
Infrastructure as Code (IaC): It allows you to define your infrastructure in code, which can be version controlled, reused, and shared with others. This approach facilitates consistency and accountability, helping to ensure that the deployment of infrastructure is repeatable and prevents drift between environments.
Declarative Syntax: Terraform’s HCL is declarative, meaning you describe the desired final state of your infrastructure, and Terraform figures out how to achieve that state. This abstracts away the procedural steps required for deployment, significantly simplifying infrastructure management.
Platform Agnostic: Terraform can manage infrastructure on multiple cloud platforms as well as on-premises. This capability allows you to manage a hybrid or multi-cloud environment seamlessly with a single set of tooling.
Modularity: Terraform configurations can be composed of modules, making it easy to package and encapsulate a set of resources and reuse them across different projects or parts of your infrastructure.
State Management: Terraform maintains a state file, which holds the current state of the infrastructure Terraform is managing. This state allows Terraform to map real-world resources to your configuration, track metadata, and perform resource dependencies and change planning accurately.
Change Automation and Orchestration: Terraform plans and applies changes in a consistent and predictable manner. It calculates the difference between the current state and the desired state and executes the necessary actions to make the real-world infrastructure match the desired state, handling resource dependency resolution.
Collaboration and Workflow: By integrating easily with version control systems and supporting remote state backends, Terraform facilitates collaboration within and between teams. It supports a standard workflow to plan, review, and apply changes, which makes it compatible with Continuous Integration/Continuous Deployment (CI/CD) pipelines.
Scalability: Terraform is designed to handle large-scale infrastructures, making it suitable for both small projects and massive enterprise environments.
Community and Ecosystem: Terraform benefits from an active community that contributes to its large ecosystem of providers (plugins for different services and APIs) and modules (pre-packaged configurations for common setup patterns).
Safety and Predictability: Terraform generates an execution plan before making any changes, which means you can review what Terraform will do before it does it, helping to avoid unexpected changes.
Set up aws cil and configure credentials
1.Install aws-cli with WINDOW Operator System
Download and run the AWS CLI MSI installer for Windows (64-bit): https://awscli.amazonaws.com/AWSCLIV2.msi Alternatively, you can run the msiexec command to run the MSI installer.
msiexec.exe /i https://awscli.amazonaws.com/AWSCLIV2.msi
For various parameters that can be used with msiexec, see msiexec on the Microsoft Docs website. For example, you can use the /qn flag for a silent installation.
msiexec.exe /i https://awscli.amazonaws.com/AWSCLIV2.msi /qn
- To confirm the installation, open the Start menu, search for cmd to open a command prompt window, and at the command prompt use the aws –version command.
2.Install aws-cli with Linux Operator System
Linux x86 (64-bit)
Linux ARM Note (Optional) The following command block downloads and installs the AWS CLI without first verifying the integrity of your download. To verify the integrity of your download, use the below step by step instructions.
To install the AWS CLI, run the following commands.
$ curl “https://awscli.amazonaws.com/awscli-exe-linux-x86_64.zip" -o “awscliv2.zip”
unzip awscliv2.zip
sudo ./aws/install`
To update your current installation of the AWS CLI, add your existing symlink and installer information to construct the install command using the –bin-dir, –install-dir, and –update parameters. The following command block uses an example symlink of /usr/local/bin and example installer location of /usr/local/aws-cli.
$ curl “https://awscli.amazonaws.com/awscli-exe-linux-x86_64.zip" -o “awscliv2.zip”
unzip awscliv2.zip
sudo ./aws/install –bin-dir /usr/local/bin –install-dir /usr/local/aws-cli –update
3. Config aws credentials
Use command below to config aws credentials
aws configure
Enter your credentials, let’s get it at AWS console
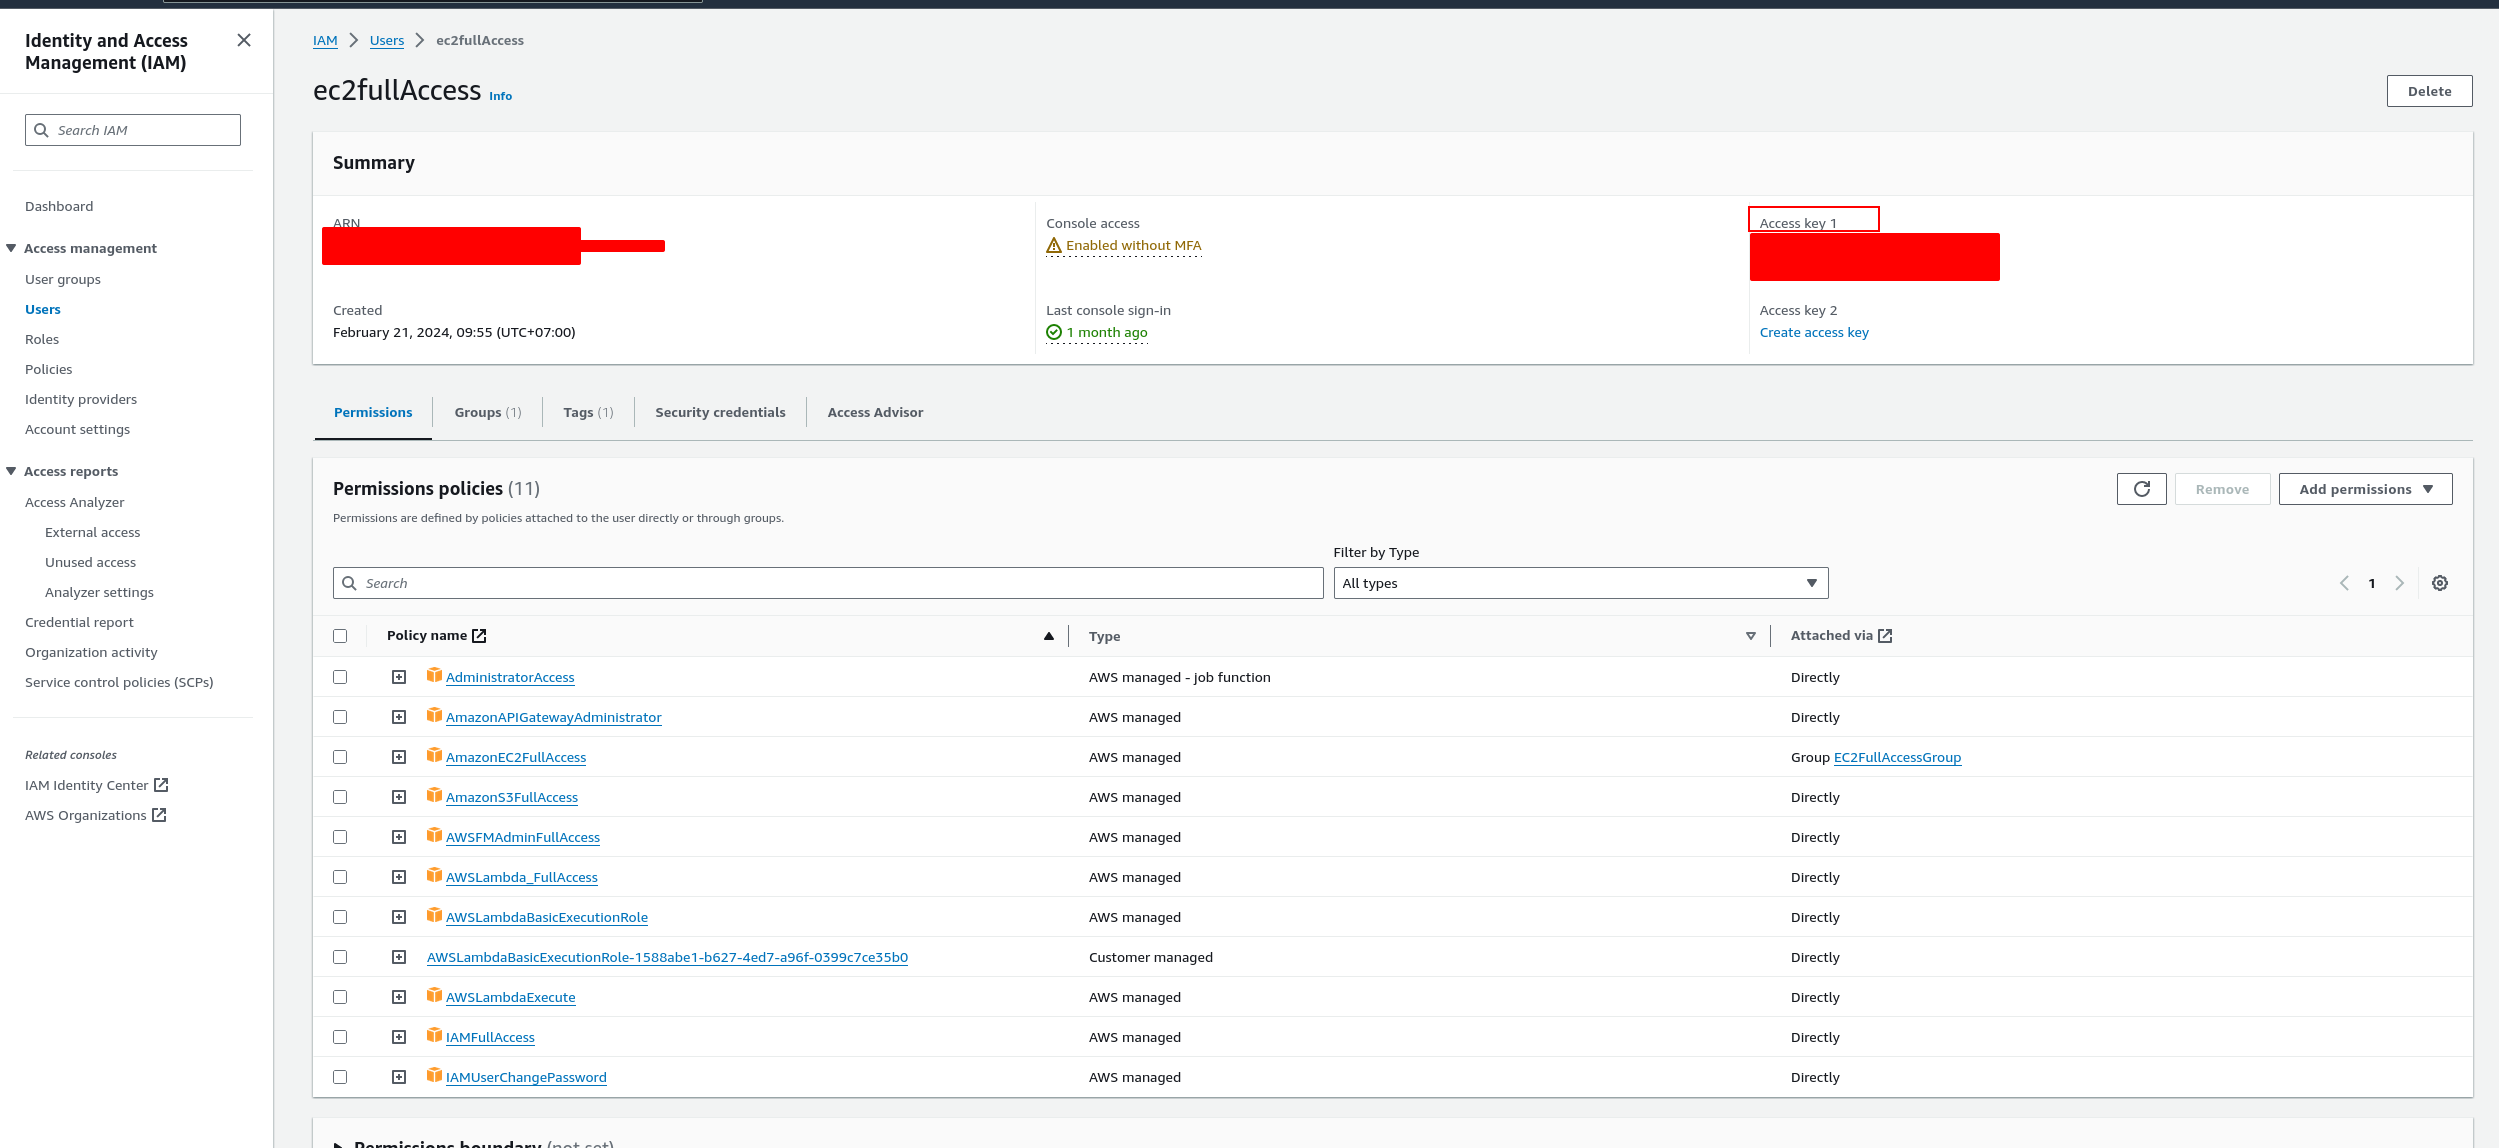
Go to https://us-east-1.console.aws.amazon.com/iamv2/home?region=us-east-1#/users
Create new user

View info and get credentials
Configure your credentials like below (replace
XXXwith your info)`@daotq1:~$ aws configure AWS Access Key ID [****************]: XXXXXXXXXXXXXXXXXXXXXXXXXXXXXX AWS Secret Access Key [****************]: XXXXXXXXXXXXXXXXXXXXXXXXXXXXXX Default region name [us-east-1]: us-east-1 Default output format [None]:`Testing info is correct. Use command below for testing credentials that’s work aws iam list-roles If you received response like below, it’s successfully connected.
  luongtx@daotq1:~$ aws iam list-roles
  {
  "Roles": [
  {
  "Path": "/service-role/",
  "RoleName": "aws-code-pipeline",
  "RoleId": "AROA4KDNQH5RRHWH2N6E3",
  "Arn": "arn:aws:iam::846338211683:role/service-role/aws-code-pipeline",
  "CreateDate": "2024-03-04T07:08:45+00:00",
  "AssumeRolePolicyDocument": {
  "Version": "2012-10-17",
  "Statement": [
  {
  "Effect": "Allow",
  "Principal": {
  "Service": "codebuild.amazonaws.com"
  },
  "Action": "sts:AssumeRole"
  }
  ]
Project Structure
There are source code architecture, we are separately component
├── aws-resources
│ ├── 00_main.tf
│ ├── 01_vpc.tf
│ ├── 02_subnet.tf
│ ├── 03_ig.tf
│ ├── 04_routeTable.tf
│ ├── 05_sg.tf
│ ├── 06_bastionHost.tf
│ ├── 07_nlb.tf
│ ├── 08_nat.tf
│ ├── 09_iam-role.tf
│ ├── 10_eks-cluster.tf
│ ├── 11_eks-nodes.tf
│ ├── 12_registry.tf
│ ├── 13_database.tf
│ ├── 14_caching.tf
│ ├── 15_sqs..tf
│ ├── 16_s3.tf
│ ├── 17_alb.tf
│ ├── 18_cloudfront.tf
│ ├── 19_waf.tf
│ ├── 20_code-build.tf
│ ├── deploy-out.tf
│ └── variables.tf
├── deploy.tfplan
├── error.txt
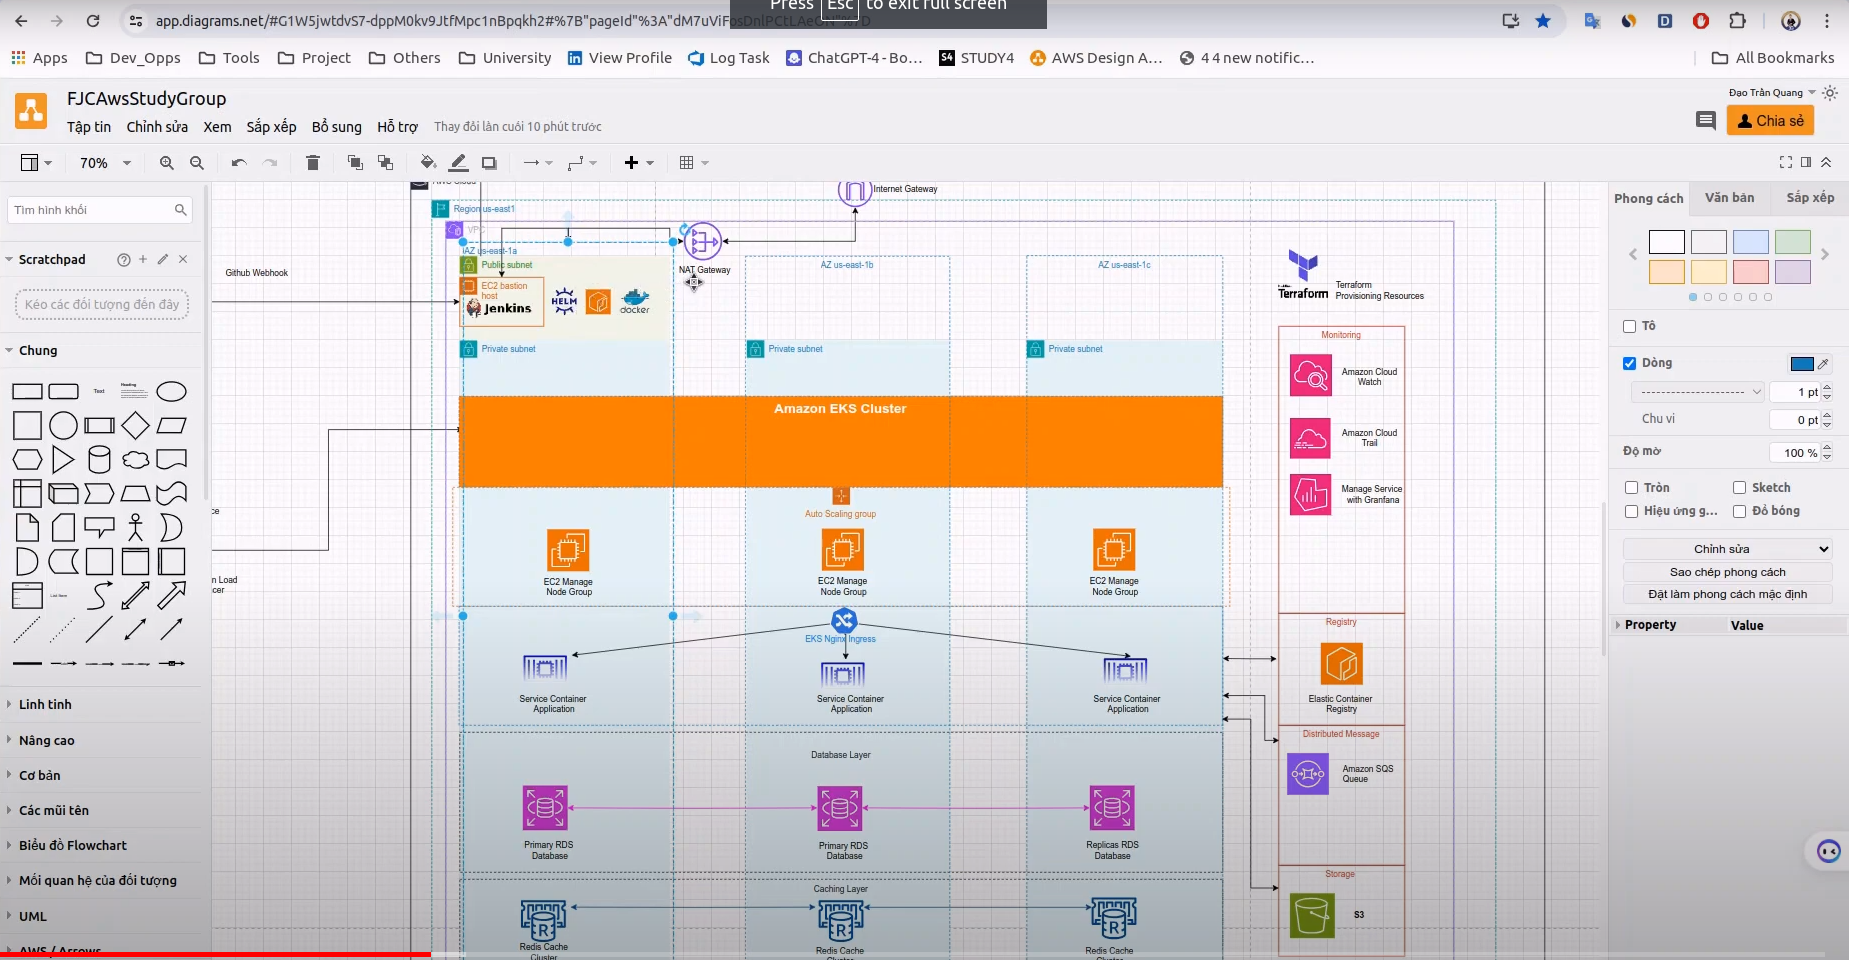
├── Infastructure-Design.png
├── main.tf
├── provider.tf
├── readme.md
├── script
│ ├── jenkins-install.sh
│ └── terraform.tfstate
├── ssh
├── terraform
├── terraform-apply.sh
├── terraform-destroy.sh
├── terraform-plan.sh
├── terraform.tfstate
└── terraform.tfstate.backup
- aws-resources is directory contains .tf file to create resources on AWS like vpc, eks, waf, nat
- provider.tf is file contains dependency like aws, kubernetes…
- terraform-plan.sh we are using this file to run command terraform plan
- terraform-apply.sh we are using this file to run command terraform apply
- terraform.tfstate to store bindings between objects in a remote system and resource instances declared in your configuration.
- provider.tf providers allow Terraform to interact with cloud providers, SaaS providers, and other APIs
Refer to my source code
**Github repository: ** https://github.com/daotq2000/aws-iaac-terraform